When referring to Pi-hole, most people recognize it as an internet ad blocker. Pi-hole is capable of more than just ad blocking, it can also provide Dynamic Host Configuration Protocol (DHCP) services and Domain Name System (DNS) services.
For those not familiar with Pi-hole, it’s free to install and very simple to get up an running. Depending on how you configure your network, the most time consuming part might be updating the DNS settings of the various devices on your network to specify Pi-hole should be used as the DNS server. When installing Pi-hole, it is best to install it on a separate device, something as simple as a Raspberry Pi is often used, but an old laptop could be re-purposed with a compatible operating system (Ubuntu, Debian, Fedora, CentOS).
When adding Pi-hole to your network, odds are your existing network router is configured as a DHCP server. If you leave your network router as the DHCP server, you will noticed Pi-hole will display IP addresses for the devices instead of their assigned names. To have Pi-hole display the device names, you will need to disable DHCP on your network router and enable it in Pi-hole.
DHCP Configuration
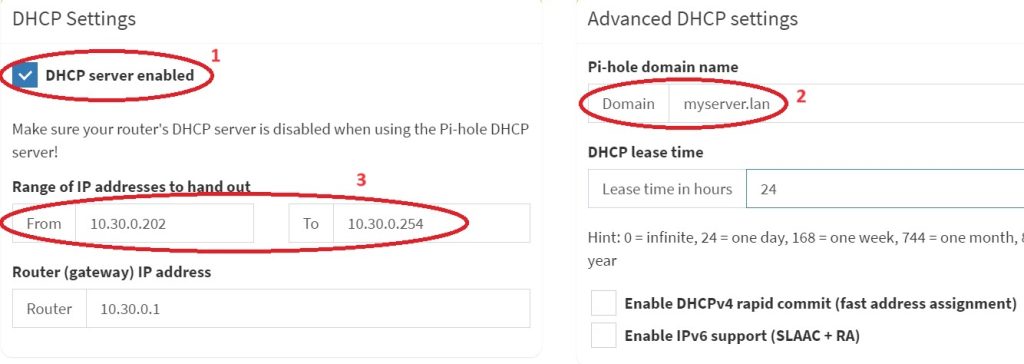
When enabling DHCP on Pi-hole (1) and entering configuration information, consider the following…. You can enter anything you like for the Domain (2). This comes into play if you also utilize Pi-hole for local DNS lookups, more on this later. When defining the range of IP addresses to hand out (3), consider defining a subset of your available intranet IP addresses. Odds are your intranet will have a range of 254 addresses that can be assigned. Item 3 in the image indicates that Pi-hole will only assign addresses between 10.30.0.202 – 10.30.0.254 to devices. This allows you to assign static IP addresses to devices in the range of 10.30.0.1 – 10.30.0.201, which will prevent conflicts with the addresses assigned by Pi-hole.
DNS Configuration
If you are setting up Pi-hole only for ad blocking and don’t have a robust home network, odds are you won’t benefit from DNS services. However, if you are a small business, have a home IT lab, or have systems running various services, you might consider using the DNS component as well.
If you have multiple services running on your network that you interact with, setting up DNS service on your local network can make things much easier to access and manage. Without local DNS, when accessing services on your network, you would use the assigned IP address of the system the service is running on. For instance, if you are running a web site on your local network, you would enter the IP address of the server. This can become a bit cumbersome having to remember the IP addresses of everything in your network if you run multiple services on various devices; specially if you have a home lab and frequently make changes. Now you could modify the hosts file on the computer you use to perform host name resolution, but that can be a hassle to manage if you have multiple work computers you use, or make network configuration changes because the hosts file would have to be updated each time on each computer. Having a local DNS server greatly simplifies things as all of the configurations are stored in a single location. Then, all of the devices on the local network use the DNS server for host name lookups, and if a match isn’t found, Pi-hole DNS will query the request to an internet DNS server.
When entering DNS information in Pi-hole, there are two types of DNS entries, DNS Records and CNAME Records. You start by first creating a DNS entry.
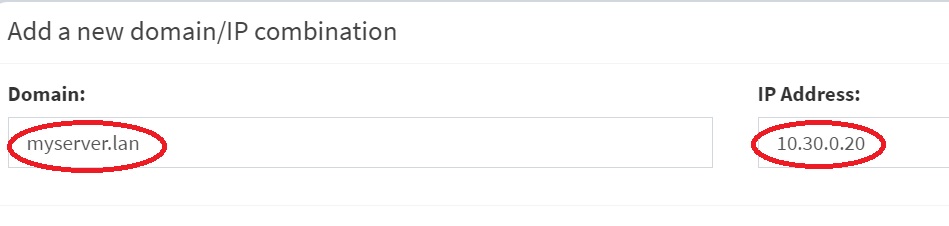
In the example to the right, the DNS entry references a computer on your local network that is running a service you interact with. If you want to access this service, you would just enter myserver.lan into your browser instead of the IP address. This can simplify things greatly if you have a network with a lot of services and devices, or make frequent changes to the configuration. If you run multiple services on the same server (box), you don’t create multiple Domain Records since they would have the same IP address. Instead, you would use CNAMES.
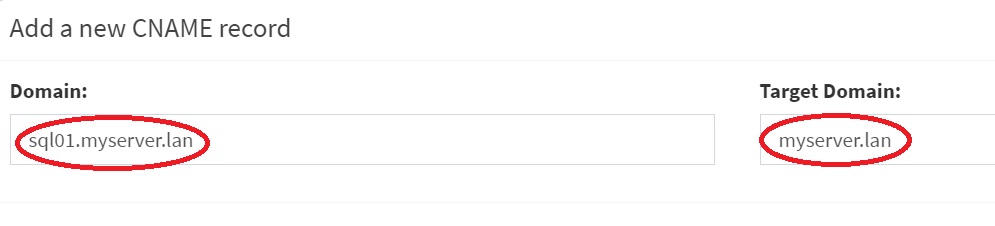
DNS CNAMEs are aliases that refer to an existing Domain Name configuration. Above, you created a DNS Record name ‘myserver.lan’ and associate it to IP address 10.30.0.20 – now lets say you are running a web server and database server on the same box (10.30.0.20). With CNAME records, you create aliases for those services that reference an existing Domain Record, (web01.myserver.lan and sql01.myserver.lan). These both would have ‘myserver.lan’ at the Target Domain. Now, if you change IP address, you only change the Domain Record and not the CNAME records. The CNAME records will still work since they are pointing to the Domain.
Conclusion
If you are only interested in ad blocking, you might be questioning if it wouldn’t be easier to just use a browser plug-in on your computer instead. It might be, but consider the following – a lot of ads on the internet also collect a lot of information from site visitors, and if you have a smart TV or use a streaming device connected to a TV, those connected devices are also sending a lot of information to the service providers. This article Shocking: Smart TV Manufacturer Vizio Spies On Customers Using Advanced Big Data Analytics points out how personal information is being collected.
I use Pi-hole at home and have been happy with it. On my home network in the last 48 hours Pi-hole has blocked fls-na.amazon.com 1294 times and device-metrics-us-2.amazon.com was blocked 702 times… and these numbers keeps increasing. This is just two examples.
By incorporating Pi-hole into your network, every device will benefit from the ad blocking functionality. There are no browser plugins to install and every device, no matter what type will benefit from the ad blocking.
There are occasions where Pi-hole ad blocking will disrupt some websites. There are some websites that have incorporated logic to detect if an ad blocker is being used, and if detected, will prevent the site from being displayed. In those instances if you still want to view the site, you can go into the Pi-hole admin console and temporarily disable ad blocking. Another option you have if it’s a site you frequently visit, you can tell Pi-hole to exclude the site from ad blocking so that it will load.
Something else to be aware of… if the computer running Pi-hole ever goes off line, any computer on your network configured to use Pi-hole for DNS will lose access to the internet until it comes back online. The networking configuration settings allow for two DNS server entries, and you might be thinking you could indicate Pi-hole as one, then enter another such as Google DNS (8.8.8.8) as the second. The issue with this when going to internet sites, your computer randomly selects which DNS it will use. So some times it might route your request through Pi-hole, then other times it might not so you won’t have consistent and reliable ad blocking.
This can be resolved, but it would require running Pi-hole on two separate devices, each with its own IP address. There are some other things to take into consideration if you are thinking of setting up two Pi-hole devices in your network. It isn’t difficult to configure, and once done, you will have automatic fail-over and they can sync information between them.
This wasn’t intended to be an exhaustive or detailed how-to… but if you have questions, either leave a comment or send a message.